
I'm still very new to this crochet lark. My Mum can crochet like the Devil plays the fiddle* (very fast & very well), but could never slow down enough for me to keep up with her. So every attempt to crochet ended up in a tangle of yarn & a sudden & passionate distrust of anything that involved yarn & a hook (that includes you, French knitting. How much of my youth was wasted on you, until I realised that 11 meters of thin tube knitting was only useful as a cat toy!).
The most frustrating things was hearing seasoned crocheters cheerfully say 'Oh, it's easy!' as their fingers moved in a blur and doilies (another pointless thing) were seemingly spun out of thin air.
Grrr. Crochet isn't easy. It's simple, but it's not easy.
After several attempts to learn from books, and then getting frustrated at the aforementioned books (insert hook where?), a friend of mine recommended 'The Happy Hooker' by Debbie Stoller (who gave us the novice knitters bestest friend 'Stitch 'n Bitch', which would be the best knitting book on earth if they had replaced that bloody ipod cosy with a good sock pattern).
Huzzah! For now I can crochet. Mostly.
Will be posting some crochet patterns soon, as well as blathering on about seeds.
*Or guitar, if you're more Robert Johnson inclined. And who isn't?!
Saturday, 28 February 2009

Tuesday, 24 February 2009
Cascabel Chile

It's been a while since I last talked about chiles (and about mmm 3 hours since I last ate some), so today it's the turn of a rather overlooked chile, which is a shame, as it's really lovely, the Cascabel.
Cascabel means "Little bell", rather appropriately, as it is a small (2-3cm in diameter) cherry shaped chile. When dried the loose seeds in the chile rattle when its shaken, hence it's other common name of Rattle chile. Another name is chile bola (ball chile). When fresh, cascabel comes in red or green, though when dried it is a dark red/brown colour.
It's flavour is woody & acidic, with a bit of tannin in there too. It's spicey, but not hot, somewhere along the lines of Jalapeno or Guajillo chiles.
What can you do with it? As with the other chiles I've mentioned, you can deseed & remove the stem, toast briefly in a dry frying pan & soak in hot water until soft, then drain & blitz in a blender or food processor with a bottle of passata or a can or two of tomatoes to make a sauce for enchiladas, chilli or lasagna. Or chuck in a blender with a can of chickpeas, a couple of cloves of garlic & the juice of a lime for a tangy houmous. Or you can chop & fry them with onions & garlic, add a cup of rice & 2 cups of vegetable stock & simmer until the rice is done (stirring in a can of black beans & some sweetcorn at the end of cooking) for spicy rice.
Cascabel means "Little bell", rather appropriately, as it is a small (2-3cm in diameter) cherry shaped chile. When dried the loose seeds in the chile rattle when its shaken, hence it's other common name of Rattle chile. Another name is chile bola (ball chile). When fresh, cascabel comes in red or green, though when dried it is a dark red/brown colour.
It's flavour is woody & acidic, with a bit of tannin in there too. It's spicey, but not hot, somewhere along the lines of Jalapeno or Guajillo chiles.
What can you do with it? As with the other chiles I've mentioned, you can deseed & remove the stem, toast briefly in a dry frying pan & soak in hot water until soft, then drain & blitz in a blender or food processor with a bottle of passata or a can or two of tomatoes to make a sauce for enchiladas, chilli or lasagna. Or chuck in a blender with a can of chickpeas, a couple of cloves of garlic & the juice of a lime for a tangy houmous. Or you can chop & fry them with onions & garlic, add a cup of rice & 2 cups of vegetable stock & simmer until the rice is done (stirring in a can of black beans & some sweetcorn at the end of cooking) for spicy rice.
Om Nom Nom!
Thursday, 12 February 2009
Talking Chit
 Despite the snow* & it being the Coldest-February-Since-Records-Began, here at the House At The Top Of The Bloody Great Hill thoughts have turned to growing veg.
Yes, the house is up for sale, but considering the currant economic climate, we'll probably be here until the summer anyway, so we may as well grow some veg.
So I've been thinking about planting quick-cropping vegetables, interesting salads, baby root veg & dwarf beans (which mature faster than the taller varieties). The sort of things that go from seed packet to plate in 1 or 2 months. That way it's a Challenge rather than an Inconvenience.
But we still want to grow potatoes.
Luckily, previous experiments in growing stuff have shown us that it's pretty easy to grow spuds in containers & pots. So the plan is to grow as many potatoes as possible in as many containers as possible. We'll be growing spuds in trugs, patio planters (a fancy name for reinforced woven polyethylene sacks), buckets, pots, troughs and malt sacks.
Potatoes grow surprisingly well in containers. You don't need an allotment or a big garden to grow your own tasty spuds, just space for a few pots.
You'll need to get your seed potatoes (small potatoes, usually around the size of an egg that are specially grown & disease & virus free. You can use shop bought potatoes, but they may have blight or some other nasties in them, and may not produce as many spuds as a certified seed potato) from a good supplier. The Organic Gardening Catalogue has a good range of potatoes. There are many tasty, unusual & interesting varieties of potato out there, so it's worth having a look around. This year I'm trying out a variety of potatoes from Thomson & Morgan, as they have a wide range of unusual spuds, such as the Highland Burgundy Red, Salad Blue & the Shetland Black.
Potatoes come in 4 types, which mature at different times. You'll need to keep remember this when choosing potatoes. When do you want to be eating your spuds?
First Earlies mature very quickly, so are usually ready to eat late May to June.
Second Earlies mature a little later and are ready to harvest late June to July.
Maincrops do not do as well in pots as First & Second Earlies, they do grow but produce smaller yields than if they were in the ground. They are ready for harvest between September to November.
Salad Potatoes are firm, waxy varieties that mature around June & July. A few varieties, such as Pink Fir Apple are not ready for harvest until August or September.
Before you plant your potatoes, they'll need to be chitted. Chitting basically means sprouting the potatoes. Chitting gets the tubers started & shortens the growing time needed to get a good crop from them, and February is the best time to do it. Potatoes can be chitted in old egg boxes or trays, make sure that you arrange them with the ends with the most eyes facing up (don't worry if you can't see the eyes, after a few days (or weeks, depending on the variety), the potatoes will start to chit & they'll become more visible, and any facing the wrong way can be repositioned) and place in an unheated room out of direct sunlight. When the sprouts are 4 or 5cm long (they'll have teeny tiny leaves on them - Eee!) they're ready to plant out.
You'll be needing a container, then. You can use pots, plastic crates, those polystyrene boxes that watercress comes in. Even a heavy duty bin bag will work. Essentially anything that's around 30cm across & deep. I've found that those black buckets that you can buy for around £1 from DIY centres with a couple of holes drilled in the bottom work beautifully.
Fill your container about a 1/4 full of soil (compost works well, garden soil is also good. I've heard that potatoes grow well in leaf mould too, though I've never tried it. Just make sure it's soil that hasn't had potatoes or tomatoes growing in it the previous year, so won't have any soil borne pests or diseases lurking in it). Place 2 or 3 potatoes in your pot, sprouty parts facing upwards, and cover with more compost. Don't fill the container, just use enough compost to just cover the tubers.
After a few weeks (or longer, depending on the potato variety) you'll have pretty little green plants. When they get to around 15cm tall, you'll need to do some Earthing Up. This just means adding another few handfuls of compost to the container to cover up the stem of your plants (don't worry about covering any of the lower leaves, they'll be fine). This prevents light from reaching the tubers and turning them green. Keep earthing up the potatoes as they grow until the container is full.
Other than that, they don't need much in the way of maintenance. Give them a soaking of water if the weather is dry and look out for any signs of pests or disease. You can wait for them to flower (the flowers are really pretty, similar to borage flowers) & die back, or you can pull them out as the flowerbuds start to appear, and get delicious little new potatoes. Yum!
*By snow I mean The-Stuff-That-Was-Snow-9-Days-Ago-But-Below-Freezing-Nighttime-Temperatures-And-Not-Much-Warmer-In-The-Day-Means-It-Has-Become-The-Hardest-Slipperiest-Substance-On-This-Earth. Just looking at it will sprain your ankles.
Thursday, 15 January 2009
Hobo Stylin'
Since MikeyFox was in danger of freezing his paws off every morning going to work, I rashly promised to make him some fingerless gloves. A half hour of scouring Knitting Pattern Central (an online directory with links to free knitting patterns for anything from skirts to companion cubes*) made me think that maybe I've bitten off more than I can chew. Mostly because all the patterns out there seem to be for teeeny lady hands, not the shovel-like mitts of a brewer.
But after a few false starts, a considerable amount of cussing & generally resenting all forms of abbreviation (how hard is it to write 'Purl 1, increase 1 in the next stitch'? Why does it have to be 'P1 inc. in next st', it's hard enough creating a thumb gusset** without having to constantly translate the instructions?), gloves were made.
 Tadaa!
If you fancy making your own bit of Hobo chic, and you have huge hands (these fits hands that are 4 1/2" - 5" wide, excluding thumb) you'll need;
4 (or 5) 4mm DPNS (yes, we'll be dancing with the DPNS in the pale moonlight)
1 ball of yarn (this pattern uses all of 1 ball, so if you're worried about running out of wool before you've finished the thumb, get another ball, it can always be used on something else), anything suitable for 4mm (or slightly larger) needles will do. I used Rowans Classic Yarns (RYC) Wool Tweed (Shetland), which I got in the January sale at John Lewis. Woo!
A stitch holder, or length of different coloured yarn.
Some stitch markers (I just used brightly coloured yarn to make my stitch markers)
A cup of tea
Okay, let's start with the right glove then!
Cast on 52 stitches onto your DPNS (I used 4 of them, having my stitches on 3 and working with the 4th, but if you're more comfortable using 5, do that instead). If you know the casting-on-with-thumb method, use that. If not, then cast on any way you can. Place a marker if you like, so you know when one row ends and another begins. Work in Knit 2 Purl 2 ribbing to make the cuff (so it's nice & stretchy and will go over your hand, but still fit snugly on the wrist) for a couple of inches (whatever is comfortable for you). I did 2" of ribbing.
Now change to Garter stitch (the one that's just knit every row, for by the magic of circular knitting, it will become inside out Stockinette. When you're finished, just turn the glove inside out & you'll have a Stockinette stitch) and when you knit this round, you'll need to increase 4 stitches evenly, giving you a total of 56 stitches (just increase 1 stitch every 13 stitches, that's nice & even). Knit 3 more rounds.
Okay, now on the next row we're doing a thumb gusset** (I know it's puerile, I just can't help it. It's a funny word). Place a stitch marker (unless you already have an end of row marker in place). Okay, you ready? Purl 1, increase in the next stitch, Knit 2 stitches, increase in the next stitch and Purl 1. Place a marker. Phew! That wasn't too bad now, was it? Now knit the rest of the row, and feel pleased with yourself! Knit 2 more rows, making sure that you Purl those two stitches on the thumb gusset**.
Next round, Purl 1, increase in the next stitch, Knit 4 stitches, increase in the next stitch and Purl 1 (see how you're starting to make a thumb. Pretty cool, eh?). Knit the rest of the row, and knit the next 2 rows, making sure that you purl those two stitches as you go.
So, you might be noticing a pattern here, yeah? With increases every 3rd row, right? Keep repeating this process (increasing inside the Purl stitches every 3rd row) until you have 18 stitches Between the 2 Purl stitches. Congratulations, you have a thumb gusset!**
Now things are going to get a bit fiddly, but then it'll be nice & easy for a while. then hard again.
Next round, Knit 1 stitch, then slip the next 18 stitches onto a stitch holder or length of string (I favour the length of string, it's much cheaper, and is also flexible). Cast on 4 Stitches (these will eventually become the rest of the thumb on your glove) and knit around, joining the cast on stitches to the main part of the glove (see how you've made a thumb hole now?). You should be back to 56 stitches on your DPNS now.
Here's a quick tip. If, like me, you're rubbish at picking up stitches, this is a little trick to help you out. Take a couple of inches brightly coloured yarn, something that's a contrasting colour to the yarn you're working with, and thread it onto a blunt ended needle. Pass that needle through those 4 cast on stitches you've just done, and leave the yarn threaded through those stitches. That yarn will sit there patiently until you come back to knit up the thumb, and when you need to pick up those stitches, all you have to do is run your needle through where the yarn is. Huzzah! No hassle stitch-picking-up!
Okay, now all that difficult stuff is done, you can take it easy. All you have to do is Knit rows until you've reached the required length of glove (depending on the length of your hand) before beginning the fingers. If you're not sure, try your glove on & see if it fits!
One things that will make life simple (but you don't have to do it if you don't want to) is place a marker between the 2nd & 3rd stitch of those 4 stitches you cast on (the ones that will make up the rest of the glove). That will come in handy soon.
Okay, next we have another difficult bit, so make a cup of tea (or pour a glass of wine). it's fiddly, but not hard, and pretty soon you'll have a glove. woo!
Remember that marker between the 2nd & 3rd stitch you cast on? Knit until you reach it. You'll be moving some stitches around it. You need the 8 stitches before & the 8 stitches after that marker on your needle. that's 16 stitches. Slip all the other stitches onto a length of string or a stitch holder, and arrange your 16 stitches on 3 (or 4) DPNS. You're about to make the first finger.
Knit all 8 stitches after the marker & cast on 3 stitches (this will be another gusset** and will be joined to the 2nd finger, so I recommend threading some yarn through these 3 stitches, to help with picking them up later), join these up with the other 8 stitches and knit until the finger is the length you require. This is a fiddly process, but won't take you long to get the inch or two of knit that you need. Cast off. Well done, you have a finger!
 So now it's time to make the 2nd finger.
Take a DPNS & pick up those 3 cast on stitches from the 1st finger gusset**. Next pick up 7 stitches from one end of the length of string/stitch holder and slip those on after the cast on stitches. Next, slip 8 stitches from the other end of the string/stitch holder and slip those onto the needle before the 3 cast on stitches. Arrange these 18 stitches evenly over 3 (or 4) DPNS and cast on 3 more stitches (again using that bit of yarn to help pick up the stitches later) for the 2nd/3rd finger gusset** to create another fingerhole and knit until you have the finger length you require. cast off, and prepare yourself for the 3rd finger.
But after a few false starts, a considerable amount of cussing & generally resenting all forms of abbreviation (how hard is it to write 'Purl 1, increase 1 in the next stitch'? Why does it have to be 'P1 inc. in next st', it's hard enough creating a thumb gusset** without having to constantly translate the instructions?), gloves were made.
Tadaa!If you fancy making your own bit of Hobo chic, and you have huge hands (these fits hands that are 4 1/2" - 5" wide, excluding thumb) you'll need;
4 (or 5) 4mm DPNS (yes, we'll be dancing with the DPNS in the pale moonlight)
1 ball of yarn (this pattern uses all of 1 ball, so if you're worried about running out of wool before you've finished the thumb, get another ball, it can always be used on something else), anything suitable for 4mm (or slightly larger) needles will do. I used Rowans Classic Yarns (RYC) Wool Tweed (Shetland), which I got in the January sale at John Lewis. Woo!
A stitch holder, or length of different coloured yarn.
Some stitch markers (I just used brightly coloured yarn to make my stitch markers)
A cup of tea
Okay, let's start with the right glove then!
Cast on 52 stitches onto your DPNS (I used 4 of them, having my stitches on 3 and working with the 4th, but if you're more comfortable using 5, do that instead). If you know the casting-on-with-thumb method, use that. If not, then cast on any way you can. Place a marker if you like, so you know when one row ends and another begins. Work in Knit 2 Purl 2 ribbing to make the cuff (so it's nice & stretchy and will go over your hand, but still fit snugly on the wrist) for a couple of inches (whatever is comfortable for you). I did 2" of ribbing.
Now change to Garter stitch (the one that's just knit every row, for by the magic of circular knitting, it will become inside out Stockinette. When you're finished, just turn the glove inside out & you'll have a Stockinette stitch) and when you knit this round, you'll need to increase 4 stitches evenly, giving you a total of 56 stitches (just increase 1 stitch every 13 stitches, that's nice & even). Knit 3 more rounds.
Okay, now on the next row we're doing a thumb gusset** (I know it's puerile, I just can't help it. It's a funny word). Place a stitch marker (unless you already have an end of row marker in place). Okay, you ready? Purl 1, increase in the next stitch, Knit 2 stitches, increase in the next stitch and Purl 1. Place a marker. Phew! That wasn't too bad now, was it? Now knit the rest of the row, and feel pleased with yourself! Knit 2 more rows, making sure that you Purl those two stitches on the thumb gusset**.
Next round, Purl 1, increase in the next stitch, Knit 4 stitches, increase in the next stitch and Purl 1 (see how you're starting to make a thumb. Pretty cool, eh?). Knit the rest of the row, and knit the next 2 rows, making sure that you purl those two stitches as you go.
So, you might be noticing a pattern here, yeah? With increases every 3rd row, right? Keep repeating this process (increasing inside the Purl stitches every 3rd row) until you have 18 stitches Between the 2 Purl stitches. Congratulations, you have a thumb gusset!**
Now things are going to get a bit fiddly, but then it'll be nice & easy for a while. then hard again.
Next round, Knit 1 stitch, then slip the next 18 stitches onto a stitch holder or length of string (I favour the length of string, it's much cheaper, and is also flexible). Cast on 4 Stitches (these will eventually become the rest of the thumb on your glove) and knit around, joining the cast on stitches to the main part of the glove (see how you've made a thumb hole now?). You should be back to 56 stitches on your DPNS now.
Here's a quick tip. If, like me, you're rubbish at picking up stitches, this is a little trick to help you out. Take a couple of inches brightly coloured yarn, something that's a contrasting colour to the yarn you're working with, and thread it onto a blunt ended needle. Pass that needle through those 4 cast on stitches you've just done, and leave the yarn threaded through those stitches. That yarn will sit there patiently until you come back to knit up the thumb, and when you need to pick up those stitches, all you have to do is run your needle through where the yarn is. Huzzah! No hassle stitch-picking-up!
Okay, now all that difficult stuff is done, you can take it easy. All you have to do is Knit rows until you've reached the required length of glove (depending on the length of your hand) before beginning the fingers. If you're not sure, try your glove on & see if it fits!
One things that will make life simple (but you don't have to do it if you don't want to) is place a marker between the 2nd & 3rd stitch of those 4 stitches you cast on (the ones that will make up the rest of the glove). That will come in handy soon.
Okay, next we have another difficult bit, so make a cup of tea (or pour a glass of wine). it's fiddly, but not hard, and pretty soon you'll have a glove. woo!
Remember that marker between the 2nd & 3rd stitch you cast on? Knit until you reach it. You'll be moving some stitches around it. You need the 8 stitches before & the 8 stitches after that marker on your needle. that's 16 stitches. Slip all the other stitches onto a length of string or a stitch holder, and arrange your 16 stitches on 3 (or 4) DPNS. You're about to make the first finger.
Knit all 8 stitches after the marker & cast on 3 stitches (this will be another gusset** and will be joined to the 2nd finger, so I recommend threading some yarn through these 3 stitches, to help with picking them up later), join these up with the other 8 stitches and knit until the finger is the length you require. This is a fiddly process, but won't take you long to get the inch or two of knit that you need. Cast off. Well done, you have a finger!
So now it's time to make the 2nd finger.Take a DPNS & pick up those 3 cast on stitches from the 1st finger gusset**. Next pick up 7 stitches from one end of the length of string/stitch holder and slip those on after the cast on stitches. Next, slip 8 stitches from the other end of the string/stitch holder and slip those onto the needle before the 3 cast on stitches. Arrange these 18 stitches evenly over 3 (or 4) DPNS and cast on 3 more stitches (again using that bit of yarn to help pick up the stitches later) for the 2nd/3rd finger gusset** to create another fingerhole and knit until you have the finger length you require. cast off, and prepare yourself for the 3rd finger.
Take a DPNS & pick up those 3 cast on stitches from the 2nd finger gusset**. Next pick up 6 stitches from one end of the length of string/stitch holder and slip those on after the cast on stitches. Then slip 7 stitches from the other end of the string/stitch holder and slip those onto the needle before the 3 cast on stitches. Arrange these 18 stitches evenly over 3 (or 4) DPNS and cast on 3 more stitches (again using that bit of yarn to help pick up the stitches later) for the 3rd/4th finger gusset**. You should have another fingerhole. yay! So knit until you have the finger length required, cast off, and rejoice! For it is the final finger!
Pick up the 3 stitches from 3rd finger gusset** & knit 2 together. it doesn't matter which 2. Slip the remaining stitches from the length of string/stitch holder onto a needle & arrange evenly over 3 (or 4) DPNS to make a fingerhole. Knit until you have the fingerlength you want, and cast off. easy!
Now the thumb. Yes, the thumb. It seems so long ago since we were last together, so much time has passed! After all the business with the fingers, the thumb is a doddle. Pick up the 4 cast on stitches (with the help of that strand of yarn) & the 18 stitches from the length of string/stitch holder, arrange on 3 (or 4) DPNS & knit until you have the thumblength you want, then cast off.
Cry huzzah! For you have a glove. Use your blunt ended needle to work in all the loose threads, turn inside out (or rather the right way around), make sure you've removed your brightly coloured threads & wear with pride!
Then realise that there is still another glove to make.
But that's okay, for you are a glove knitting master, and the pattern for the left hand is, let's be honest, is identical to the right hand.
*Knitted Companion Cubes! Eeeeeeeeeeee!
**Snerk. Gusset!
Friday, 19 December 2008
Mixiote
Mixiote is a recipe originating from pre-Colombian Mexico. Meat, usually mutton or rabbit, is seasoned with chile & wrapped in the tough outer skin of leaves from the Maguey tree, then buried in a pit with hot coals for several hours to cook. Mixiote is also the name for the Maguey leaf skins.
Since the Maguey* (Agave americana, also known as the Century plant, although it's life span is more along the lines of 25 years. The immature flowering stem is harvested to make pulque, an alcoholic beverage) isn't a common plant here in the north of England, and it takes around 11 years for each leaf to grow (being 2 meters long & covered in spines probably makes it quite a faff to harvest too), baking parchment works well as a substitute.
Living under the yoke of Yorkshires Clean Air law, a big fire pit in the garden is probably not going to happen either, so we'll be steaming the mixiote.
Also, me being a vegetarian, this recipe will be made with Quorn.
Quorn is one of the greatest things to happen to the lacto-ovo vegetarian (or Vegetarians who eat dairy products and eggs, as we're otherwise known), it's a mycoprotein food (a fancy term meaning it's a mould grown in fermentation tanks - tasty!) high in vegetable protein & dietary fibre, while also being low in saturated fat & salt. It's also delicious. And versatile. Yay, Quorn!
Okay, enough flag waving. This recipe also works with tofu or seitan too. Or if you're in the mood for some veg, butternut squash should work well instead.
Quorn Mixiotes

*In Aztec mythology, the Maguey was created by Quetzalcoatl**, the Feathered Serpent, out of the bones of Mayahuel after she was devoured by star demons. And no, I'm not making it up.
Since the Maguey* (Agave americana, also known as the Century plant, although it's life span is more along the lines of 25 years. The immature flowering stem is harvested to make pulque, an alcoholic beverage) isn't a common plant here in the north of England, and it takes around 11 years for each leaf to grow (being 2 meters long & covered in spines probably makes it quite a faff to harvest too), baking parchment works well as a substitute.
Living under the yoke of Yorkshires Clean Air law, a big fire pit in the garden is probably not going to happen either, so we'll be steaming the mixiote.
Also, me being a vegetarian, this recipe will be made with Quorn.
Quorn is one of the greatest things to happen to the lacto-ovo vegetarian (or Vegetarians who eat dairy products and eggs, as we're otherwise known), it's a mycoprotein food (a fancy term meaning it's a mould grown in fermentation tanks - tasty!) high in vegetable protein & dietary fibre, while also being low in saturated fat & salt. It's also delicious. And versatile. Yay, Quorn!
Okay, enough flag waving. This recipe also works with tofu or seitan too. Or if you're in the mood for some veg, butternut squash should work well instead.
Quorn Mixiotes
1 350g pack of quorn pieces (you could use the same amount of firm tofu, mild flavoured gluten. Heh, you could even use chicken or mutton, cut into 1" cubes)
1 Ancho chile
1 Guajillo chile
1 Pasilla chile
1/2 onion, chopped
50g ground almonds
1 sun dried tomato (or 1 fresh tomato, or 1tbs tomato puree)
2 cloves garlic, crushed
200ml Vegetable stock (although orange juice also works well)
1 tbs oil
1/4 tsp each of thyme, cumin & oregano
Salt & pepper
4 Bay leaves
4 cloves
Deseed & toast the chiles in a dry frying pan. Place in a bowl & cover with boiling water & leave to soak until soft. Drain & put into a blender or food processor with the tomato, garlic, vegetable stock & onion & blend until smooth (add a little more water if necessary). Heat oil in a saucepan until quite hot, but not smoking. Add the chile mixture & stir. It will hiss madly at you, but fear not, this will thicken up & enrich the sauce, and make it even more delicious. Reduce the heat & add the ground almonds, cumin, oregano & thyme. Leave to simmer on a low heat for around 10 minutes. Add salt & pepper to taste & put to one side.

Combine the quorn/tofu/whatever with the chile mixture. If you're using tofu or meat, leave to marinade for at least 1 hour. If the mixture is a little dry, add a little water or stock.
Cut 4 24cm squares of baking parchment or greaseproof paper & divide the mixture equally between them. Add a bay leaf & a clove to each pile & tie up into parcels (I'm using red string from brewery malt sacks, though those of you not married to brewers can use butchers string, garden twine or anything along those lines). Arrange in a steamer & steam until cooked through (for quorn or tofu this will be around 45 minutes to 1 hour). Serve the parcels with warm corn tortillas & sliced avocado.
Om Nom Nom!
*In Aztec mythology, the Maguey was created by Quetzalcoatl**, the Feathered Serpent, out of the bones of Mayahuel after she was devoured by star demons. And no, I'm not making it up.
**And also terrorised New York city in Q - The Winged Serpent
Saturday, 13 December 2008
Mincemeat - It's not minced, and it has no meat in it!
Mince Pies are a traditional food eaten in the UK at Christmas. They first appeared around the 11th Century and were originally oblong casings filled with minced meat & 3 spices; cinnamon, nutmeg & cloves (representing the gifts brought by the 3 wise men in the Nativity story). It was considered good luck to eat mince pies on each of the 12 days of Christmas.
In the 15th Century mince pies still contained meat, but also had dried fruit & vinegar or wine in them, and were savoury, spiced meat pies, rather than sweet treats. By the 18th Century brandy & sugar were combined with minced meat, dried fruits & candied peel to make something more like the mince pies we know today. Over time, omitting the meat (but replacing it with shredded beef suet) became the common practice.
Here in the UK, you can buy mince pies, or jars of ready made mincemeat, from October or November to December. But where's the fun in that, eh? Making your own mincemeat is easy, and doesn't take much time, and the results are much tastier than anything you can buy in the shops. It's also easy to substitute ingredients that you're not too fond of. Think currants are horrible dead flies, not fit to grace a pudding? Don't put them in, then. Put some chopped apricots in instead. Or whatever dried fruit floats your boat. Don't want suet? Don't put it in then. Grate 4 or 5 apples or pears into the mixture instead. Fancy something a bit tropical? Replace the almonds with slivers of coconut & the currants & raisins with dried mango & pineapple, a splash of white rum and you've got yourself something special there.
This year my mincemeat recipe is inspired by a batch of cranberry-almond cookies. Mmmmm.
Cranberry Almond Mincemeat (makes about 1.5kg/3lb. That's a lot of mince pies)
150g/6oz/1 cup vegetarian shredded suet*
225g/8oz/1 1/2 cups currants
150g/6oz/1 cup dried cranberries (preferably unsweetened)
115g/4oz/3/4 cup dates, destoned & chopped
150g/6oz/1 cup raisins
225g/8oz/1 1/4 cup sultanas
115g/4oz/1 cup flaked almonds
1 apple, grated
90ml/6 tbsp clear honey
60ml/4 tbs dark rum
1 tsp ground mixed spice
1/2 tsp ground cinnamon
Juice & zest of 1 orange
Combine all ingredients in a large mixing bowl. I roughly chop the dried fruit beforehand. I like the texture you get with it. You don't have to do it yourself though. An old English tradition is to only stir the mincemeat clockwise. Stirring anticlockwise will bring bad luck in the coming year. So stir it clockwise. Cover & store in a cool place for 2 days, occasionally giving it a stir & getting giddy on the rum fumes. Spoon into sterilised jars & seal. Store until needed.
*Yes, I know suet is Bad and Will Kill You. But this is a recipe I make once a year, so use the Special Occasion Defense. It gives the mincemeat a richer flavour & keeps everything moist. You can substitute it with 4 or 5 large apples (or pears) grated into the mix & a cup full of cider, apple juice or orange juice.
In the 15th Century mince pies still contained meat, but also had dried fruit & vinegar or wine in them, and were savoury, spiced meat pies, rather than sweet treats. By the 18th Century brandy & sugar were combined with minced meat, dried fruits & candied peel to make something more like the mince pies we know today. Over time, omitting the meat (but replacing it with shredded beef suet) became the common practice.
Here in the UK, you can buy mince pies, or jars of ready made mincemeat, from October or November to December. But where's the fun in that, eh? Making your own mincemeat is easy, and doesn't take much time, and the results are much tastier than anything you can buy in the shops. It's also easy to substitute ingredients that you're not too fond of. Think currants are horrible dead flies, not fit to grace a pudding? Don't put them in, then. Put some chopped apricots in instead. Or whatever dried fruit floats your boat. Don't want suet? Don't put it in then. Grate 4 or 5 apples or pears into the mixture instead. Fancy something a bit tropical? Replace the almonds with slivers of coconut & the currants & raisins with dried mango & pineapple, a splash of white rum and you've got yourself something special there.
This year my mincemeat recipe is inspired by a batch of cranberry-almond cookies. Mmmmm.
Cranberry Almond Mincemeat (makes about 1.5kg/3lb. That's a lot of mince pies)
150g/6oz/1 cup vegetarian shredded suet*
225g/8oz/1 1/2 cups currants
150g/6oz/1 cup dried cranberries (preferably unsweetened)
115g/4oz/3/4 cup dates, destoned & chopped
150g/6oz/1 cup raisins
225g/8oz/1 1/4 cup sultanas
115g/4oz/1 cup flaked almonds
1 apple, grated
90ml/6 tbsp clear honey
60ml/4 tbs dark rum
1 tsp ground mixed spice
1/2 tsp ground cinnamon
Juice & zest of 1 orange
Combine all ingredients in a large mixing bowl. I roughly chop the dried fruit beforehand. I like the texture you get with it. You don't have to do it yourself though. An old English tradition is to only stir the mincemeat clockwise. Stirring anticlockwise will bring bad luck in the coming year. So stir it clockwise. Cover & store in a cool place for 2 days, occasionally giving it a stir & getting giddy on the rum fumes. Spoon into sterilised jars & seal. Store until needed.
*Yes, I know suet is Bad and Will Kill You. But this is a recipe I make once a year, so use the Special Occasion Defense. It gives the mincemeat a richer flavour & keeps everything moist. You can substitute it with 4 or 5 large apples (or pears) grated into the mix & a cup full of cider, apple juice or orange juice.
Piccalilli
Piccalilli is a variety of pickle or relish that first appeared in the UK around the middle of the 18th Century, often going by the name of Piccalillo or Indian Pickle. It is a tangy, chunky pickle, made bright yellow with the addition of mustard & turmeric, and is an excellent accompaniment to bread & cheese, sandwiches & cold meats.

Place all your chopped veggies in a colander or a large bowl & cover with the salt. Give everything a stir, cover & leave in a cool place overnight (or 24 hours if possible). The salt will draw out moisture from the veggies (so if you are using a colander, place it in a bowl), so when they are cooked, they will remain firm & crunchy. Yum.
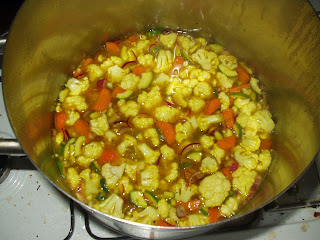
The next day, marvel at how much water has come out of the veg. Then discard. Sorry, salty veggie water. Give your veggies a quick rinse with cold water & pat dry.
And it's very easy to make.
Since MikeyFox was stuck at home with a bad back, it seemed like a good time to introduce him to the noble art of preserving, so we made Piccalilli.
Piccalilli takes a bit of time & planning, and you'll need to get started the night before. You will need...
1 small cauliflower, broken into small florets (not too small, it's a chunky pickle after all)
1 courgette, split in half lengthways & chopped (any curcubit will do, though. Half a cucumber, deseeded & chopped is good. Or marrow, again deseeded & chopped*.)
2 carrots, peeled & chopped
2 onions, finely chopped
50g fine sea salt
Place all your chopped veggies in a colander or a large bowl & cover with the salt. Give everything a stir, cover & leave in a cool place overnight (or 24 hours if possible). The salt will draw out moisture from the veggies (so if you are using a colander, place it in a bowl), so when they are cooked, they will remain firm & crunchy. Yum.
The next day, marvel at how much water has come out of the veg. Then discard. Sorry, salty veggie water. Give your veggies a quick rinse with cold water & pat dry.
If you don't have a big preserving pan, any large stainless steel pan will work fine. Into the pan goes
500ml cider vinegar or white wine vinegar
250g sugar
2 tsp yellow mustard powder
1 tsp turmeric (to make it Yellow!)
1/2 tsp each of ground ginger, cumin seeds, yellow mustard seeds, chilli flakes & grated nutmeg.
Stir over a low heat until the sugar dissolves. Increase the heat & bring to the boil. Add the vegetables, and some fresh ground pepper (as much or as little as you want). Bring to the boil & then reduce the heat & simmer, uncovered, for 10 minutes.
While the Piccalilli is simmering, you'll need to do one more thing. You'll need
2 tbs cornflour
Place in a small bowl & add a little of the cooking liquid from the pan & stir until you have a smooth paste. This is to thicken up the piccalilli liquid. So at the end of the 10 minutes of simmering, remove the pan from the heat & add the cornflour paste. Stir & return to the heat, bring it to the boil & simmer for 5 minutes. The liquid will thicken up & coat the still-crunchy vegetables.
Spoon into warm, sterilised jars & seal. If you can bear to leave it be for a month, all the flavours will mellow & mature, and it will be delicious. If you can't, that's okay too. It will still be delicious.
Om Nom Nom!
*It's nothing personal, seedy bits. You're just soggy and tasteless is all.
Subscribe to:
Posts (Atom)
