
But after a few false starts, a considerable amount of cussing & generally resenting all forms of abbreviation (how hard is it to write 'Purl 1, increase 1 in the next stitch'? Why does it have to be 'P1 inc. in next st', it's hard enough creating a thumb gusset** without having to constantly translate the instructions?), gloves were made.
 Tadaa!
If you fancy making your own bit of Hobo chic, and you have huge hands (these fits hands that are 4 1/2" - 5" wide, excluding thumb) you'll need;
4 (or 5) 4mm DPNS (yes, we'll be dancing with the DPNS in the pale moonlight)
1 ball of yarn (this pattern uses all of 1 ball, so if you're worried about running out of wool before you've finished the thumb, get another ball, it can always be used on something else), anything suitable for 4mm (or slightly larger) needles will do. I used Rowans Classic Yarns (RYC) Wool Tweed (Shetland), which I got in the January sale at John Lewis. Woo!
A stitch holder, or length of different coloured yarn.
Some stitch markers (I just used brightly coloured yarn to make my stitch markers)
A cup of tea
Okay, let's start with the right glove then!
Cast on 52 stitches onto your DPNS (I used 4 of them, having my stitches on 3 and working with the 4th, but if you're more comfortable using 5, do that instead). If you know the casting-on-with-thumb method, use that. If not, then cast on any way you can. Place a marker if you like, so you know when one row ends and another begins. Work in Knit 2 Purl 2 ribbing to make the cuff (so it's nice & stretchy and will go over your hand, but still fit snugly on the wrist) for a couple of inches (whatever is comfortable for you). I did 2" of ribbing.
Now change to Garter stitch (the one that's just knit every row, for by the magic of circular knitting, it will become inside out Stockinette. When you're finished, just turn the glove inside out & you'll have a Stockinette stitch) and when you knit this round, you'll need to increase 4 stitches evenly, giving you a total of 56 stitches (just increase 1 stitch every 13 stitches, that's nice & even). Knit 3 more rounds.
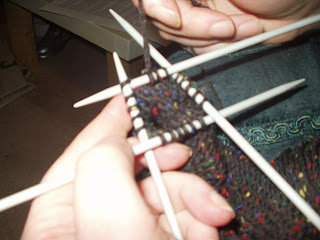
Okay, now on the next row we're doing a thumb gusset** (I know it's puerile, I just can't help it. It's a funny word). Place a stitch marker (unless you already have an end of row marker in place). Okay, you ready? Purl 1, increase in the next stitch, Knit 2 stitches, increase in the next stitch and Purl 1. Place a marker. Phew! That wasn't too bad now, was it? Now knit the rest of the row, and feel pleased with yourself! Knit 2 more rows, making sure that you Purl those two stitches on the thumb gusset**.
Next round, Purl 1, increase in the next stitch, Knit 4 stitches, increase in the next stitch and Purl 1 (see how you're starting to make a thumb. Pretty cool, eh?). Knit the rest of the row, and knit the next 2 rows, making sure that you purl those two stitches as you go.
So, you might be noticing a pattern here, yeah? With increases every 3rd row, right? Keep repeating this process (increasing inside the Purl stitches every 3rd row) until you have 18 stitches Between the 2 Purl stitches. Congratulations, you have a thumb gusset!**
Now things are going to get a bit fiddly, but then it'll be nice & easy for a while. then hard again.
Next round, Knit 1 stitch, then slip the next 18 stitches onto a stitch holder or length of string (I favour the length of string, it's much cheaper, and is also flexible). Cast on 4 Stitches (these will eventually become the rest of the thumb on your glove) and knit around, joining the cast on stitches to the main part of the glove (see how you've made a thumb hole now?). You should be back to 56 stitches on your DPNS now.
Here's a quick tip. If, like me, you're rubbish at picking up stitches, this is a little trick to help you out. Take a couple of inches brightly coloured yarn, something that's a contrasting colour to the yarn you're working with, and thread it onto a blunt ended needle. Pass that needle through those 4 cast on stitches you've just done, and leave the yarn threaded through those stitches. That yarn will sit there patiently until you come back to knit up the thumb, and when you need to pick up those stitches, all you have to do is run your needle through where the yarn is. Huzzah! No hassle stitch-picking-up!
Okay, now all that difficult stuff is done, you can take it easy. All you have to do is Knit rows until you've reached the required length of glove (depending on the length of your hand) before beginning the fingers. If you're not sure, try your glove on & see if it fits!
One things that will make life simple (but you don't have to do it if you don't want to) is place a marker between the 2nd & 3rd stitch of those 4 stitches you cast on (the ones that will make up the rest of the glove). That will come in handy soon.
Okay, next we have another difficult bit, so make a cup of tea (or pour a glass of wine). it's fiddly, but not hard, and pretty soon you'll have a glove. woo!
Remember that marker between the 2nd & 3rd stitch you cast on? Knit until you reach it. You'll be moving some stitches around it. You need the 8 stitches before & the 8 stitches after that marker on your needle. that's 16 stitches. Slip all the other stitches onto a length of string or a stitch holder, and arrange your 16 stitches on 3 (or 4) DPNS. You're about to make the first finger.
Knit all 8 stitches after the marker & cast on 3 stitches (this will be another gusset** and will be joined to the 2nd finger, so I recommend threading some yarn through these 3 stitches, to help with picking them up later), join these up with the other 8 stitches and knit until the finger is the length you require. This is a fiddly process, but won't take you long to get the inch or two of knit that you need. Cast off. Well done, you have a finger!
 So now it's time to make the 2nd finger.
Take a DPNS & pick up those 3 cast on stitches from the 1st finger gusset**. Next pick up 7 stitches from one end of the length of string/stitch holder and slip those on after the cast on stitches. Next, slip 8 stitches from the other end of the string/stitch holder and slip those onto the needle before the 3 cast on stitches. Arrange these 18 stitches evenly over 3 (or 4) DPNS and cast on 3 more stitches (again using that bit of yarn to help pick up the stitches later) for the 2nd/3rd finger gusset** to create another fingerhole and knit until you have the finger length you require. cast off, and prepare yourself for the 3rd finger.
Take a DPNS & pick up those 3 cast on stitches from the 2nd finger gusset**. Next pick up 6 stitches from one end of the length of string/stitch holder and slip those on after the cast on stitches. Then slip 7 stitches from the other end of the string/stitch holder and slip those onto the needle before the 3 cast on stitches. Arrange these 18 stitches evenly over 3 (or 4) DPNS and cast on 3 more stitches (again using that bit of yarn to help pick up the stitches later) for the 3rd/4th finger gusset**. You should have another fingerhole. yay! So knit until you have the finger length required, cast off, and rejoice! For it is the final finger!
Pick up the 3 stitches from 3rd finger gusset** & knit 2 together. it doesn't matter which 2. Slip the remaining stitches from the length of string/stitch holder onto a needle & arrange evenly over 3 (or 4) DPNS to make a fingerhole. Knit until you have the fingerlength you want, and cast off. easy!
Now the thumb. Yes, the thumb. It seems so long ago since we were last together, so much time has passed! After all the business with the fingers, the thumb is a doddle. Pick up the 4 cast on stitches (with the help of that strand of yarn) & the 18 stitches from the length of string/stitch holder, arrange on 3 (or 4) DPNS & knit until you have the thumblength you want, then cast off.
Cry huzzah! For you have a glove. Use your blunt ended needle to work in all the loose threads, turn inside out (or rather the right way around), make sure you've removed your brightly coloured threads & wear with pride!
Then realise that there is still another glove to make.
But that's okay, for you are a glove knitting master, and the pattern for the left hand is, let's be honest, is identical to the right hand.
*Knitted Companion Cubes! Eeeeeeeeeeee!
**Snerk. Gusset!
